All documentation
Connecting ServiceM8 to GoHighLevel
Connect your two accounts, run the Setup Wizard, and you are done. About ten minutes, and you only do it once — after this the sync runs on its own and there are no buttons to press.
Paste in a ServiceM8 API key. Paste in a GoHighLevel token and location ID. Open the Setup Wizard in the menu and answer one question. If you only want contacts and tags, that really is all of it — the rest of this page is for people building a pipeline, or who want to know what the wizard is doing on their behalf.
-
Connect ServiceM8
In ServiceM8, go to Settings → API Keys and press Add API Key. Give it a name you will recognise later — something like
TradesSync— choose Full Access rather than Read Only, and press Create.Copy the key, paste it into the Credentials tab in TradesSync, and press Test Connection. A green tick and your ServiceM8 business name means you are connected.
Why full access?Read access alone will not reach your job queues, categories and badges, which is where most trades keep the information that matters. Full access is what lets TradesSync see all of it. It still only ever reads — nothing is written back to ServiceM8.
-
Connect GoHighLevel
In GoHighLevel, go to Settings → Private Integrations and create a new private integration. Name it whatever you like and tick all the scopes. GoHighLevel will give you a Private Integration Token, which starts with
pit-.Copy that token straight away and paste it somewhere safe. GoHighLevel shows it once — close the popup without copying it and you will have to create another integration from scratch.
You also need your Location ID. It is under Settings → Business Profile, or you can take it straight from your browser's address bar while you are in the location — it is the part after
/v2/location/.Put both into the Credentials tab and press Test Connection. Your location name should come back.
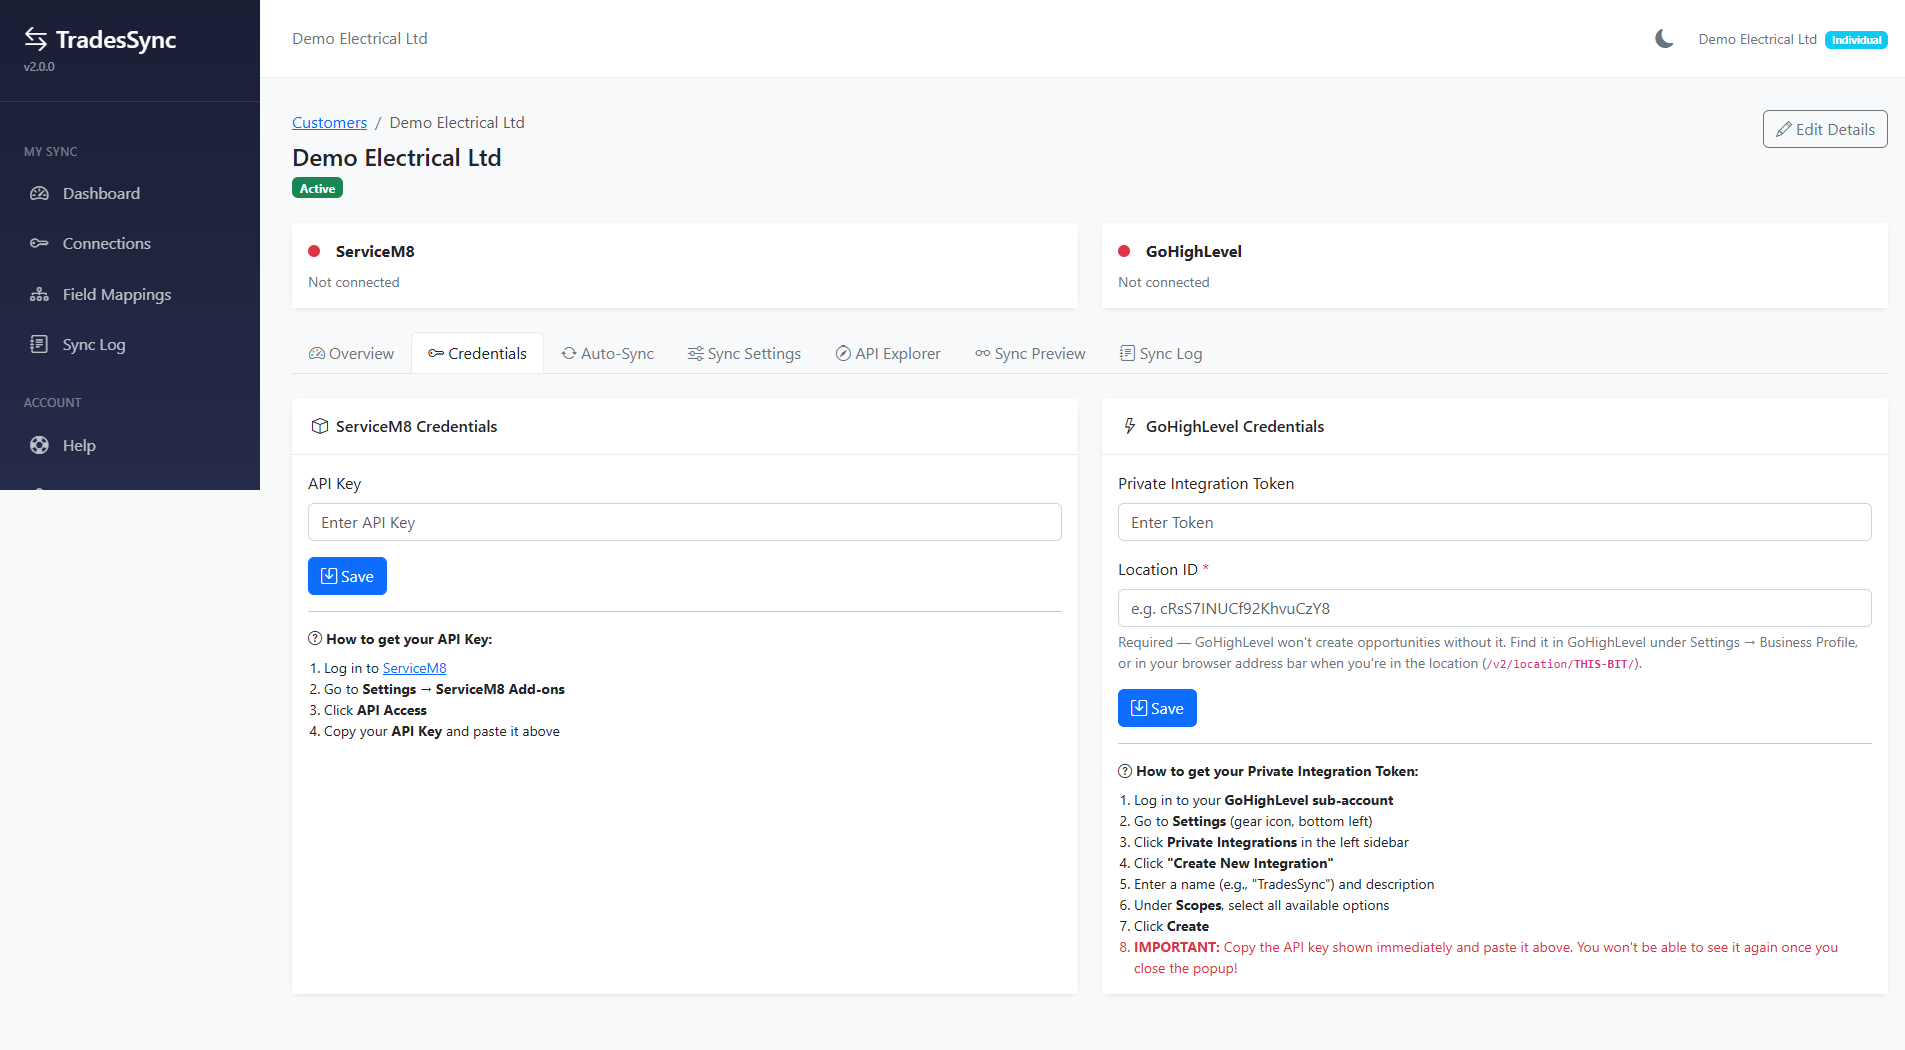
The Credentials tab. Both connections start red and turn green once a key is saved and tested. Step-by-step instructions for each sit under the fields. The Location ID is not optional.GoHighLevel will not create an opportunity without knowing which location it belongs to. If you leave it out, contacts will sync and opportunities will fail.
-
Run the Setup Wizard
Once both accounts are connected, Setup Wizard appears in the menu down the left. It asks one question — what do you want TradesSync to do? — and configures the rest for you.
You pick It sets up Tag my contacts so my workflows can pick them up Contacts only, with a tag for each ServiceM8 job status. It suggests sensible tags, and offers the tags already in your GoHighLevel so you can pick rather than type. Two minutes and you are finished. Move jobs through my GoHighLevel pipeline Opportunities on, and it asks which of status, queue or category should drive the stage. Then it hands you to the stage mapping with everything else already done. Both Tags on the contact and opportunities on the pipeline. For most people that is the whole setup. If you picked tags, you are done — skip to What happens next. If you picked a pipeline, carry on below.
It will not overwrite work you have already done.If you have already mapped stages or tags, the wizard says so before it changes anything, and points you at the full settings page instead. Your field mappings and if/then rules are never touched by it either way, so it is safe to open out of curiosity.
Everything the wizard does can also be done by hand on the four-step settings page, and the rest of this guide explains what it is setting for you. You do not need to read it to get going.
-
Turn on multiple opportunities in GoHighLevel
While you are still in GoHighLevel, go to Settings → Objects → Opportunities and switch on “Allow more than one opportunity per contact in the same pipeline”. GoHighLevel ships with this turned off.
With it off, a contact can only ever hold one opportunity in a given pipeline. The first job you do for a customer comes across, and every job after that is refused.
That does not suit a trade business. Your regulars have you back year after year, and each of those visits is its own job in ServiceM8. Leave this off and you would see one opportunity per customer and nothing else — while their contact carries on syncing perfectly, which makes it a hard one to spot.
Do this before you start syncing.Jobs that GoHighLevel refuses do not come across on their own once you fix it. They only sync again the next time something changes on them in ServiceM8, so get in touch and we will push them through for you.
-
The two ways of running it, in full
This is the decision the wizard asked you about, explained properly. Worth reading if you are weighing up which suits you, or if you want to change later.
Contacts and tags Full pipeline What you get Your ServiceM8 clients become GoHighLevel contacts, and the job's status puts a tag on them. You build the rest with GoHighLevel workflows. All of that, plus each job becomes an opportunity that moves through your pipeline stages as the work progresses. Good if You use GoHighLevel mainly for email and automation, or you do not really use pipelines. You already run a pipeline in GoHighLevel, or you want job values and forecasting there. Setup About five minutes. Nothing to change in GoHighLevel. About twenty minutes, and one setting to change in GoHighLevel itself. New accounts start on contacts and tags.Opportunities are switched off until you turn them on, so nothing sits there half-configured while you decide. You can change your mind at any time without losing anything — turning opportunities on starts creating them from the next change onwards.
If you want contacts and tags
Open Sync Settings, press Open sync settings and go to Step 2, Pipeline. Leave Create opportunities off — with it off, the pipeline and stage columns disappear and all you see is a tag box against each thing.
ServiceM8's five job statuses are listed: Quote, Work Order, In Progress, Completed, Unsuccessful. Type the tag you want against the ones you care about and leave the rest blank. Start typing and your existing GoHighLevel tags appear — pick from that list rather than typing from memory, because a tag with a typo in it is a brand new tag and the workflow you built will not fire on it.
Press Save all mappings. Then, back on the Sync Settings tab, press the contacts and tags only button so we stop reminding you to map pipeline stages you have no intention of mapping.
That is the whole setup. Within five minutes your clients start appearing as contacts, tagged by the status of their job. Point a workflow at one of those tags and you are away. You can skip the rest of this page.
If you want the full pipeline
Turn Create opportunities on in Step 1, Setup, then carry on below.
-
Choose what drives your pipeline stage
This is the one decision only you can make, and it is the most important part of a pipeline setup. Open the Sync Settings tab, find the ServiceM8 → GoHighLevel panel and press Open sync settings. That opens a four-step page: Setup, Pipeline, Fields and Advanced.
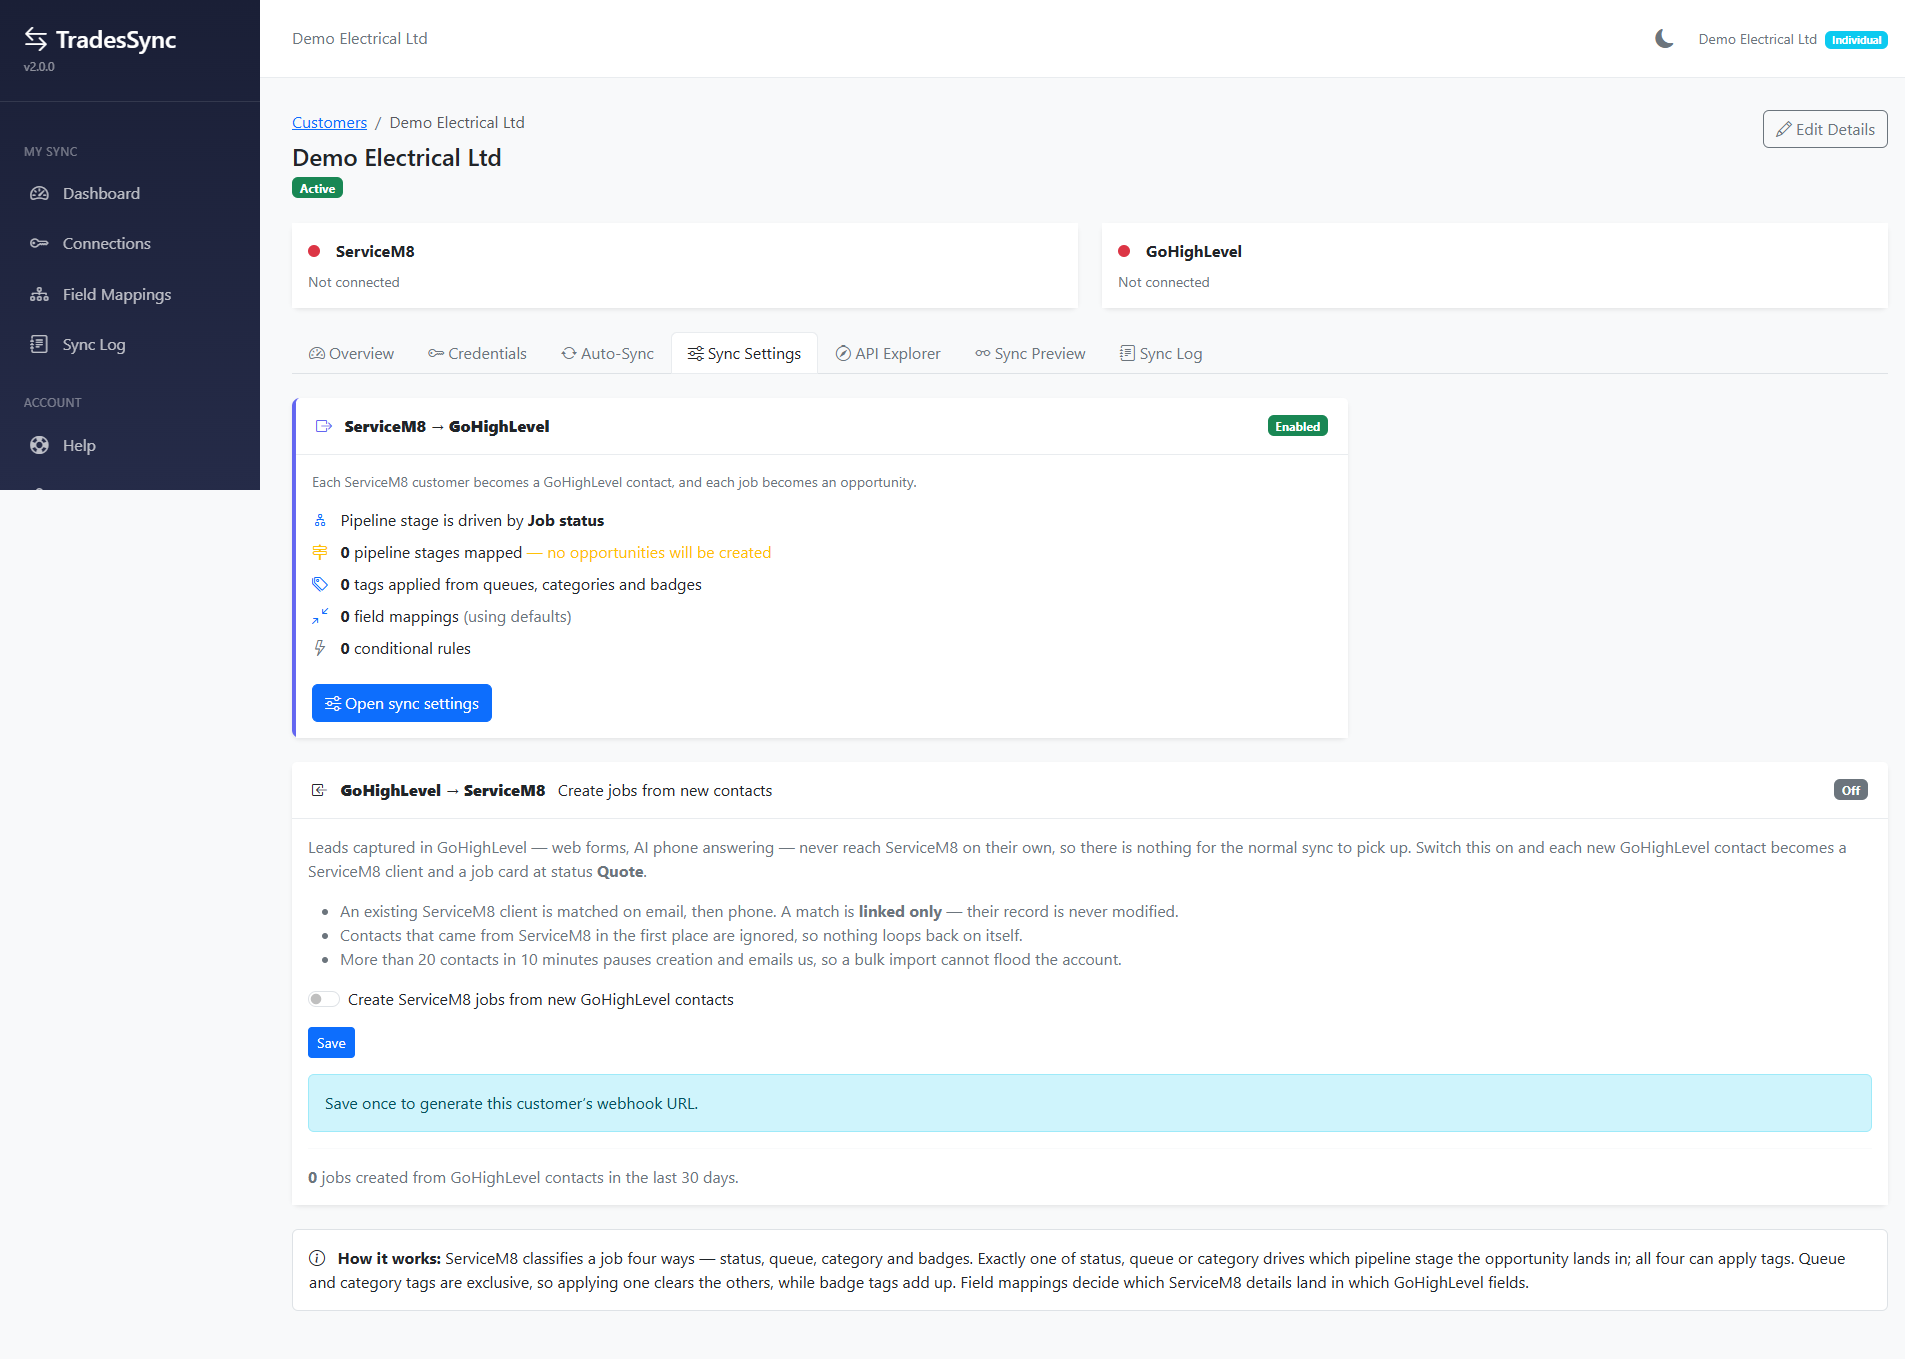
The Sync Settings tab. The top panel is the main sync; the panel below it is the optional lead path, off by default. On Step 1, Setup is the question that matters: what moves a job through the pipeline? ServiceM8 sorts jobs four different ways — status, queue, category and badges — and you pick one of the first three to move opportunities along your GoHighLevel pipeline. All four can apply tags regardless of which one you pick.
Option When it suits you Job status Simple, but only five fixed values: Quote, Work Order, In Progress, Completed, Unsuccessful. Queue Your own ServiceM8 queues. This is what most trades actually run their workflow on — if you drag jobs between queues day to day, pick this. Category The type of work, if that is how your pipeline is laid out. Then move to Step 2, Pipeline. This is the only step you have to fill in — everything else has a sensible default. Only the option you chose in Step 1 offers pipeline and stage columns. Work down it and, for each ServiceM8 value, choose which pipeline and stage it should land in. These cannot be guessed for you: your pipelines are unique to your GoHighLevel account.
The ones you did not pick still earn their keep. They appear on the same Step 2 page and can apply tags instead, and so can your badges. That is how EICR or needs certificate ends up on a contact for your workflows to trigger from. See Tags.
Map every value, not just the obvious ones.Anything without a stage against it produces no opportunity at all. The one people miss is usually the one their jobs are actually sitting in — Parts Awaited, Materials to Order, that sort of thing. The contact still syncs, so nothing looks broken; the opportunity just never appears.
Step 3, Fields and Step 4, Advanced are both optional. The field defaults already cover what most trades need, and Step 4 holds won/lost statuses and if/then rules that most accounts never touch.
Press Save all mappings when you are done. Anything you leave unmapped simply will not create an opportunity — the contact still syncs, so nothing breaks.
-
Check it before it goes live
Open Sync Preview, pick one of your real jobs and press Preview. You will see exactly what would be sent to GoHighLevel — the contact, the opportunity, the value, the stage, the tags — without anything being sent.
If it looks right, you are done. If it does not, adjust your mappings and preview again. There is no limit on how many times you can run it.
What happens next
TradesSync checks ServiceM8 every five minutes for anything new or changed and brings it across. Nothing gets duplicated: it remembers which ServiceM8 job matches which GoHighLevel opportunity, so the same job is always updated rather than created twice.
The sync starts from the day you connect and picks things up as they are created or changed from that point. An older job only appears once something about it changes in ServiceM8. If you would like your back catalogue brought across, just ask and we will run it for you.